≡ Menu

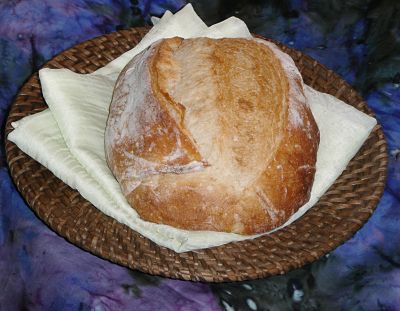
Today we have a very special treat, a savory 3 cheese gluten free bread recipe brought to us by Kaelie Ann Huculak Belanger.
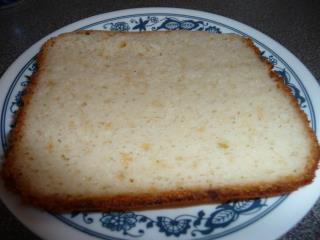
gluten_free_cheese_bread

The Importance of a Bread Maker in Making Gluten Free Bread

For 2 years, I tried making gluten free bread without a bread maker. The results were less than consistent. As someone who had been very well known for making whole wheat breads, pumpernickel bread, cinnamon buns and more, it was frustrating.

That all changed when my husband said “Enough! Try a bread maker!”…..and so I did and the results improved beyond measure! I think that a bread maker makes such a big difference because it is such a controlled environment!

I use a Zojirushi bread maker and the recipe that Kaelie has so graciously made for us is done in a Cuisinart convection bread maker CBK-200C. As you know, the results might be different in your machine, so adjust according to your manufacturers instructions!
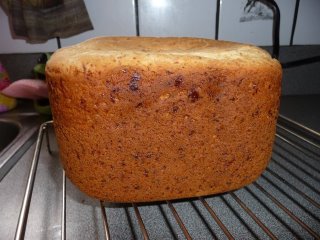
Kaelies_3_cheese_gluten_free_bread

3 Cheese Gluten Free Bread 

by Kaelie Ann Huculak Belanger (pictures are from Kaelie, as well!)

Makes a 2 pound loaf

1 3/4 cups Lowfat milk or milk substitute (almond breeze, rice dream, coconut milk etc) room temp 80-90f

3 tbsp extra virgin olive oil

2 large eggs at room temperature (can place them in a hot bowel of tap water for 5 to ten min for food safety)

3 tbsp liquid honey

1 tsp cider vinegar

1 1/2 tsp sea salt

4 cups of all purpose gluten free flour mix 

3/4 tsp of gelatin (this is optional but highly recommended for texture purposes)

1/3 cup plus 2 tbsp shredded cheddar cheese (medium or old)

1/3 cup plus 2 tbsp shredded mozzarella

1/4 cup of grated parmesan cheese

2 1/4 tsp instant yeast (Fleischmann’s)

Putting the Gluten Free Ingredients Together

Add the milk, eggs, oil, vinegar and honey to the bread pan fitted with the kneading paddle. Stir all remaining ingredients together (except for the yeast) in a separate bowl to have even distribution of the ingredients.

Add the mixed dry ingredients to the bread pan and make a small indentation in the top of the dry ingredients with thumb or spoon (not too deep).

Place yeast in your indent.

Place the bread pan in your cuisinart.

Press menu and select your gluten free option.

Press crust and select desired crust to taste (light, medium or dark); I chose Medium.

Press loaf and select 2 pounds.

Press start to get your bread started.

During kneading, scrape the sides of your bread pan (using a rubber spatula) to get any crumbs or ingredients sticking on the side. When cycle is complete after approximately 2 hours and 44 minutes, remove bread from machine.

Immediately slide it out of the pan on your cooling rack to prevent sweating or soggy bread. Allow to cool for at least half an hour. Then cut and enjoy this heavenly bread!
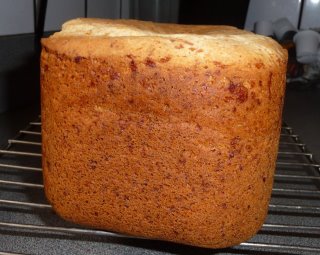
3_cheese_gluten_free_bread


Extra Notes About the 3 Cheese Gluten Free Bread Recipe

  • Make sure all ingredients are at room temp even the cheeses
  • The gelatin helps create the proper texture and moisture and the cider vinegar works as a natural preserving agent 
  • Very healthy and nutrient rich bread
  • Can use lactose free cheeses and or grated soy cheese for those with dairy allergies

Enjoy! Thank you, Kaelie, for this great recipe!

What is your biggest challenge in going gluten free?

{ 9 comments }

When we first started eating gluten free, we thought it would be a simple matter.  You just didn’t eat wheat and the grains that have gluten.  So we eliminated them. Easy, right?  Not so much…if you have been eating gluten free and are still suffering from symptoms, you might be accidentally ingesting gluten in a way that you wouldn’t have even thought of. 

hidden_sources_gluten

The Obvious Sources of Gluten

  • Wheat
  • Barley
  • Rye
  • Triticale
  • Spelt
  • Farro
  • Kamut
  • Oats that are not certified gluten free 

These are the most common ones that you will run into and is by no means a complete list. Please check with a dietitian for a complete list or your local celiac association.

Have you seen those lovely packages of fig newton bars that are “Wheat-free”?  In the beginning of our journey, I saw the “Wheat-free” on the label and thought I was in luck. They had been my favorite cookie back in the day when I thought I could eat gluten.  

Remember this!!  “Wheat-free” does NOT mean “gluten-free”.  There can be other gluten containing foods in there!

The Hidden Sources of Gluten

(Once again, this is not an exhaustive list, there are probably others!)

  • Your kitchen, if you are not a completely gluten free home. If you have any kind of food prep going on in your kitchen (think flour flying in the air as wheat flour is measured). Yes. Once that is airborne, the flour dust is contaminating you.
  • The wooden spoon that you used to stir your son’s non gluten free oatmeal is contaminated.  The proteins can stick inside the tiny little cracks and crevices of the wooden utensil.
  • Your makeup and lipstick can contain gluten.
  • Toothpaste!! Do you or your child complain of a tummy ache after brushing their teeth?
  • Shampoos and conditioners are notorious for containing gluten products. Go read the label on yours!
  • Suntan lotions or any skin lotion
  • Play dough
  • Pet food quite often contains gluten. Your pet spills a bit of the food on the floor, crumbs get everywhere, you walk on it in bare feet…yes, still cross contamination.
  • Modified food starches…modified from what?  If it does not specify from what it has been modified, assume that it is wheat or another gluten containing grain.
  • Thickeners…again, assume it is a gluten based thickener, that is the cheapest and most common for manufacturers to use.  Did you know that you can contact manufacturers and restaurants and ask for clarification on their product label ingredients?
  • Sauces…again, assume they are wheat based unless it says otherwise.
  • Malt, another source of gluten and this sneaky one is in a lot of chocolate bars!

Looking for Hidden Gluten

Knowledge is your friend.  As I have said before, learn as much as you can and go from there. Research, research, research and then research some more.

Read the labels, all the time. Even if something was safe last week, the manufacturer could have changed its methods or ingredients. The extra minute can save you hours or days of grief.

Any product that you put on your mouth or in your mouth must be gluten free. If you wear makeup, remember it must also be gluten free because the skin is the largest organ in the body and it absorbs what you put on it!

Make your kitchen gluten free. If you can’t, because of family reasons, at the very least, don’t use the wooden spoons, get yourself a separate toaster (they are a terrible source of contamination, all of those crumbs!) and limit, limit, limit your exposure to wheat products.  Get someone else to do the wheat cooking and have your own set of pots and pans. It is always best to have your entire kitchen gluten free but I understand that is not always possible.

Remember, wheat free is not gluten free, there is hidden gluten everywhere and be prepared. Knowledge is your friend and there is so much knowledge available to you. This is not an exhaustive or complete list; it is a basic list, a starting point.

Good luck, you can do this!

What is the biggest challenge you have about going gluten free?

{ 4 comments }
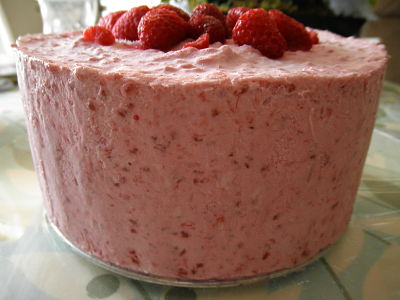
gluten_free_raspberry_mousse


This is my Dad’s birthday cake, one lovingly made by my daughters Allison and Amber. Dad turned 79 today and since he, as well as 5 other members of our family eat gluten free, this was the cake that he wanted to celebrate that milestone!!

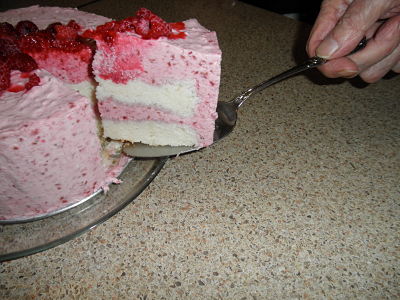
gluten_free_first_cut

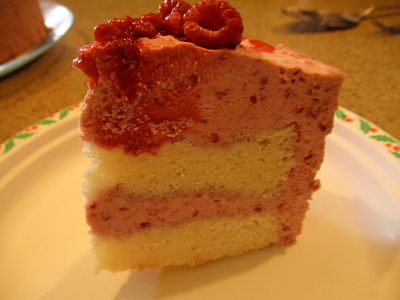
The cake is a white cake, cut into two layers with the most delicious raspberry mouse layered around it!

Gluten Free White Cake Layers

Allison and Amber used an 8 inch spring form pan to bake this delicious cake in. Here is the recipe for the cake. Please note that if you have leftover batter, it makes great cupcakes!

Gluten Free White Cake

Grease the 8 inch spring form pan well. Preheat your oven to 350 degrees F.

In a large bowl cream together:

3/4 c. butter

1 1/2 c. white sugar

Add

4 large eggs

1 tsp. vanilla

In a separate bowl, mix the dry ingredients together

3 cups of all purpose gluten free mix (a purchased one or this one that you make)

1/2 tsp. salt

5 tsp. baking powder

Add the dry ingredients to the wet mix in your large bowl alternating with

1 1/4 cups of whole milk

Mix until thoroughly blended, approximately 2 to 3 minutes

Fill the pan no more than 2/3 full of batter (there will be leftover batter, cupcake time!) and bake in your preheated 350 degree oven for 30-40 minutes. This will depend on your oven and other factors, so be sure to test with a cake tester to see if done before you take it out!

When it’s done, let cool on a wire rack.

When thoroughly cool, you will be using a sharp knife to cut the cake into two layers, shaving off any brown edges to leave a thoroughly clean and white cake!

Gluten Free Raspberry Mousse

This raspberry mousse recipe is originally from Cathy Lowe at the Food Network and can be found here.

1/3 cup of sugar

3 cups of frozen raspberries

2 tablespoon of lemon juice, either fresh or organic lemon juice from a bottle

2 tablespoons of Knox unflavored gelatin

3 cups of whipping cream (whipped to give you 6 cups of volume)

We use frozen raspberries because you can find them at a reasonable price! If they are in season, though, fresh raspberries are an excellent choice!

Mix 1 1/2 cups of the fresh or frozen berries with the 1/3 cup of sugar and the lemon juice. Cook until it is a thin liquid and done. Stir in the Knox gelatin and let it soften. Remove from heat and scrape into a large empty bowl. Cool it down for about 5-7 minutes.  Mix 1 cup of your whipped cream into the mix and then gently fold in the rest of the whipped cream.  Let chill in a bowl in the refrigerator while you prepare the cake layers!

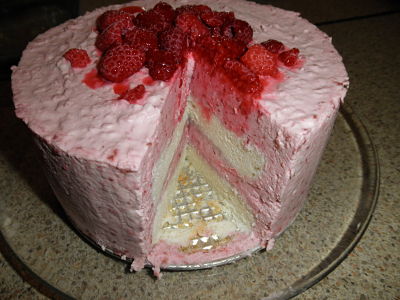
inside_gluten_free_raspberry


Put your first half of the cake layer back in the same spring form pan that you used to bake it.  Clean the pan thoroughly first and make sure it is really, really dry.

Carefully place the mousse on the sides of the cake…there will be room because you have trimmed the layers to get rid of the brown bits.

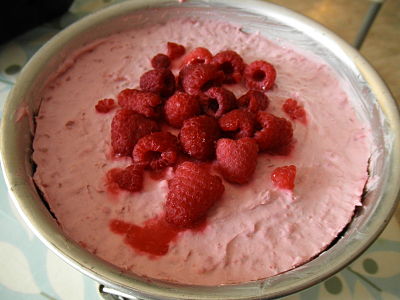
Add mousse to the top of that layer and continue putting mousse on the side. Add another cake layer, then finish off with the rest of the mousse.  You can add the 1/2 cup of thawed berries left over on top of the cake.

This is what it looks like in the pan after you complete it.

gluten_free_cake

Wrap the top with plastic wrap and then freeze for at least two hours.  When ready to serve, remove from freezer and let sit at room temperature for at least 30 minutes. Carefully remove the spring form sides, using a knife dipped in hot water if necessary!

Voila! Well worth the work!

raspberry_mousse
{ 0 comments }

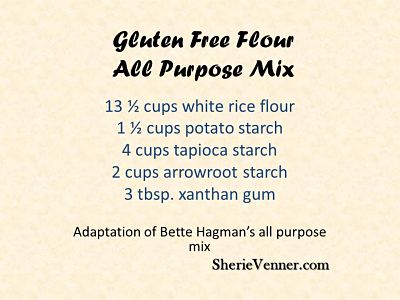
There are many gluten free all purpose mixes available on the market.  There are many gluten free all purpose mix recipes that are available on the internet and books. I found this one, many years ago, from Bette Hagman in her book "The Gluten Free Gourmet", (not an aff link), published by Henry Holt and Co. LLC.  This is my adaptation of it!


gluten_free_flour_mix


Why Make your own Gluten Free All Purpose Mix?

…because you can!  The advantage of taking a basic recipe like this is the ability to change it, if you need to. For example, in the original recipe, it called for cornstarch. In our family, we have multiple food allergies and among them is corn. Corn is a very common allergen.  While searching around for a substitute for the cornstarch, I found that the arrowroot starch (or flour as it is sometimes called) works really well!

As well, if you want to change the nutritional value of the mix, you can experiment and try substituting brown rice flour, white sorghum, millet or others for a part of the white rice flour. However, if you want a direct replacement for wheat flour in cake recipes, pancakes, waffles,muffins, quick breads, this is an excellent mix.  You will need a different mix for gluten free breads.

Making your own gluten free all purpose mix is also more convenient and more economical.  If you run out and have the basics on hand, you can make more.  That in itself has saved me a lot of grief over the years! There is nothing more frustrating than running out of flour and realizing that the store you need to get it from is closed until tomorrow.

Putting the Gluten Free All Purpose Mix Together 

I have a large plastic container that I use with a tight fitting lid.  For ease and because I can be lazy sometimes, I put the ingredients in and fasten the lid tightly, then shake, hard!

Measure and put into a large container:

13 1/2 cups of regular white rice flour

1 1/2 cups of potato starch

4 cups of tapioca starch

4 1/2 cups sweet rice (or glutinous flour, although there is NO gluten in it) flour

2 cups of arrowroot flour (or cornstarch if you have no issues with corn)

3 tbsp. xanthan gum (this works better than guar gum)

This makes enough flour for the average family of four to bake to their hearts content for up to a month. It stores well in an airtight container in a dark place in your cupboard or pantry.  Please remember, that if you substitute any of the whole grain gluten free flours for any part of this mix, you need to store it in the refrigerator or freezer to prevent rancidity.

Tell me…what is the biggest challenge you face in being gluten free?


{ 26 comments }

Are you facing the challenge of going on a gluten free diet? If you have your reasons, and you do, for going gluten free, it’s not as hard as you think it is.Yes, there are pitfalls and struggles along the way…and you can do it…even if you might be feeling panicked right now.

gluten_free_bread 

Pitfalls of a gluten free diet

  • Family who don’t believe that it is necessary (they say, try this, a little won’t hurt you). Actually, it will, so don’t do it.
  • Cross contamination when you are the only one gluten free in your home
  • Cross contamination when you go out to eat
  • Finding a variety of foods that seem “normal” to you
  • The added expense of gluten free prepared foods, if you need to buy them ready prepared instead of making them yourself

Step # 1  You are Important

Realizing that you are important and that you need to take care of your own health is key to successfully going gluten free. When you know, deep down inside, that you are worth it, you will take whatever steps are necessary to take care of yourself.

Step #2  Educate Yourself about the Gluten Free Diet

Be vigilant with reading everything you can get your hands on about gluten intolerance and celiac disease. Scour the internet for resources (yes, there are a lot of them, find them, bookmark them, read them). There are tons of books out there, in paperback, hardcover, and ebook format that provide so much valuable information.  It’s your body, know how a gluten free diet can benefit you and what you should be eating or not eating.

Step #3 It’s Time to Make Gluten Free part of your Budget

Budget your food money wisely. There will be times when you will want to just buy cookies or bread instead of making them, especially in the beginning when you are learning about the ins and outs of baking gluten free. Allow for the added expense and be realistic. If you need to have a food storage container in your pantry that is for you only, do it! Put a sign on it. “Keep out! This is for (your name)”. Hey, do what you have to do!

Step #4  Is that Food Really Gluten Free?

If in doubt, don’t eat it. When we first started on the gluten free diet, one of my girls was regularly eating couscous because the server told her it was gluten free. If you don’t know that a certain ingredient or food staple is gluten free, err on the side of caution. Don’t eat it! Check it out, you can always go back and get it another time! If you are at someone else’s house for dinner, remember step 1, you are important! Be kind and say no, anyway.

Step #5  Time Heals all Wounds

Give yourself time. Symptoms can get worse for some people in the beginning of following a gluten free diet.There can be a detox process that happens and yes, you can feel worse. Not all people, just some people. I was one of the lucky ones who had detox symptoms and it lasted for a while. I felt like I had the flu all of the time, muscle aches, etc.

Most people feel better within two weeks and love the feelings of clarity in thinking and lack of intestinal issues. The gut takes a long time to really heal…the number that I have heard and seen is up to two years, after going completely gluten free.

Going gluten free can have pitfalls and if you are prepared and are willing to set boundaries, you will succeed, really. It gets easier with time and with the implementation of new habits and new strategies…just like that.

{ 7 comments }